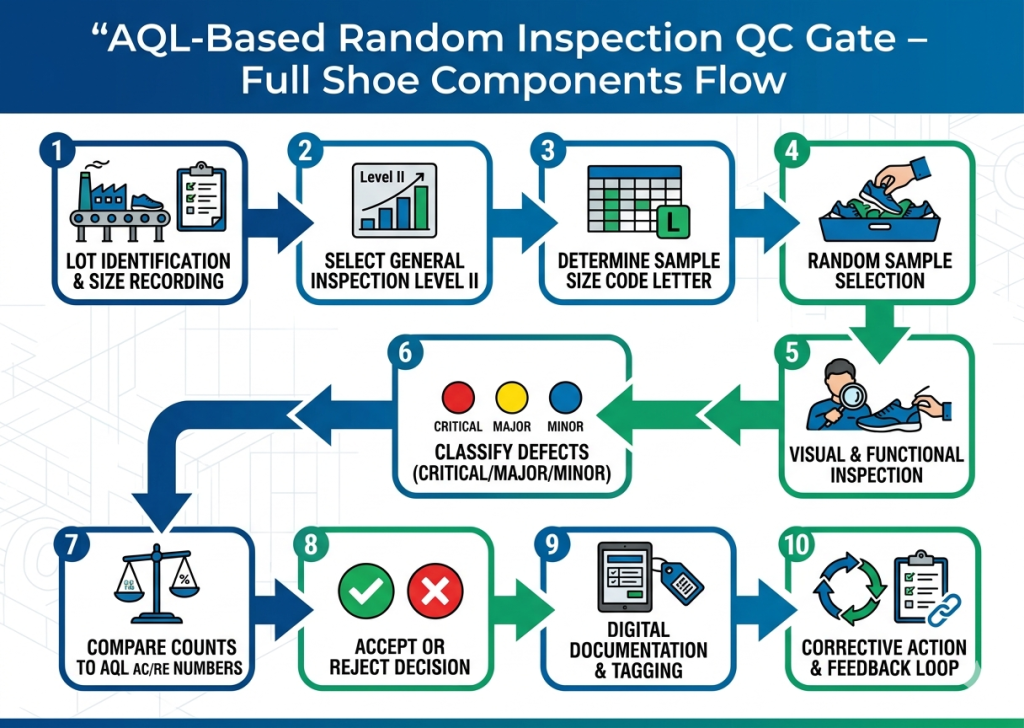
Random Inspection of Full Shoe Components (AQL QC Gate) in Full Shoe Manufacturing – Full Shoe Assembly Series
Building directly on our previous pillar blog, Full Shoe Components Receipt and Inbound Verification in Full Shoe Manufacturing – Full Shoe Assembly Series, where incoming materials receive initial checks, the next critical gate in the assembly flow is random inspection of full shoe components using the AQL-based QC system. This gate catches defects that inbound verification might miss and prevents faulty components from advancing into kitting or final assembly. Factories that master this process cut rework by up to 40 % and protect brand reputation.


Setting Up the AQL QC Gate Station for Full Shoe Components
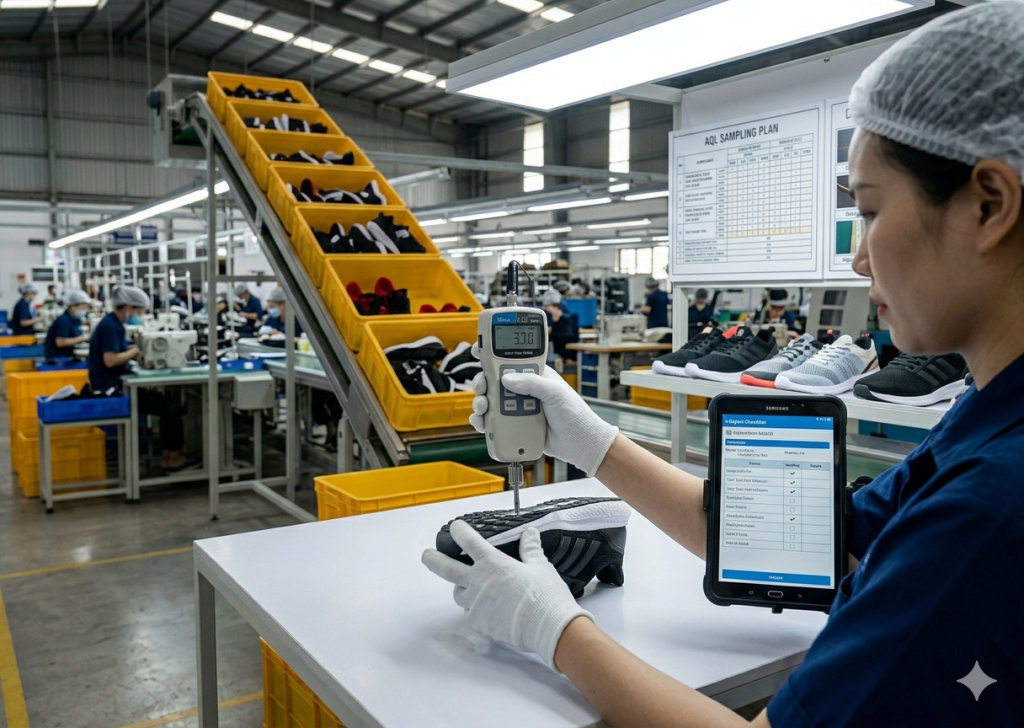
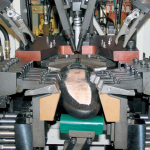
The AQL QC gate functions as a dedicated, controlled inspection point positioned after component preparation but before full shoe assembly sequencing. Inspectors use it to evaluate randomly selected full shoe components against predefined quality standards.
This gate matters because 100 % inspection slows production and raises labor costs while still missing hidden defects. AQL sampling delivers statistically reliable results with minimal disruption and catches issues early enough to trigger immediate corrective action.
Operators establish the gate by creating a dedicated station with 5000K daylight-balanced lighting, anti-glare white tables, calibrated measuring tools, and standardized defect reference samples. Trained QC personnel follow a written SOP that defines lot identification, sample selection, and documentation flow. The station integrates directly with the assembly line so rejected lots return quickly for rework.
Key Control Points:
- Maintain minimum 500 lux illumination with no shadows on inspection surfaces.
- Calibrate all measuring tools daily and log results on the station dashboard.
- Keep defect reference boards updated with current buyer specifications.
- Assign only certified inspectors who have completed AQL training within the last six months.
Expert Tip:
Position the QC gate no more than 5 meters from the component preparation line to eliminate transport damage and speed feedback loops.
Review AQL data trends monthly and adjust machine settings proactively.


Determining Lot Size and Selecting Sampling Parameters
Lot size equals the total quantity of identical full shoe components produced in one continuous run or shift. The QC team records this number on the lot traveler before sampling begins.
Accurate lot definition and parameter selection prevent under-sampling that misses defects or over-sampling that wastes time. Correct parameters deliver the right balance between risk and efficiency.
The team consults the ANSI/ASQ Z1.4 (or ISO 2859-1) table, selects General Inspection Level II for standard footwear production, and identifies the code letter that corresponds to the lot size. They then choose AQL values—typically 0 % for critical defects, 2.5 % for major defects, and 4.0 % for minor defects. The code letter directly determines the exact sample size.
Key Control Points:
- Record lot size, production date, and style number on every lot traveler before sampling.
- Use General Inspection Level II unless the buyer specifically requests Level I or III.
- Apply separate AQL limits for critical, major, and minor defects in every inspection.
- Verify code letter against the latest AQL table revision posted at the station.
Expert Tip:
Create a laminated quick-reference AQL card at every station that shows lot-size ranges and corresponding sample sizes for Level II – inspectors save 2–3 minutes per lot.
Keep physical defect samples refreshed every 30 days to match current production.


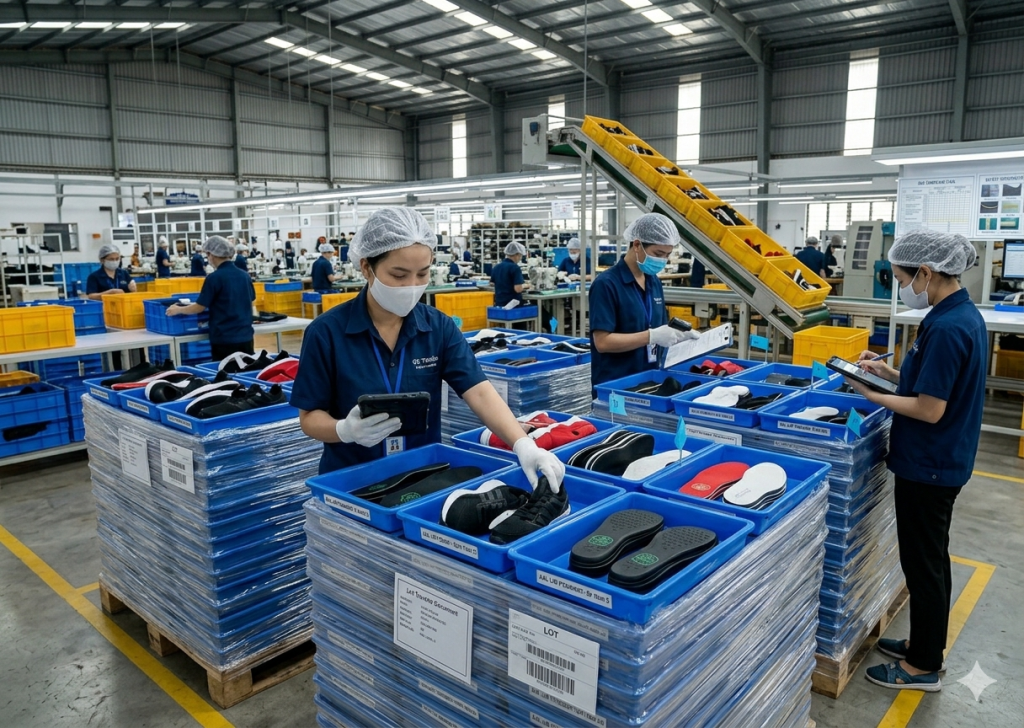
Performing Random Selection of Full Shoe Components
Random selection means picking components without bias from the entire lot using a pre-approved method such as random number generation or systematic interval sampling. Randomness ensures the sample truly represents the lot and gives management confidence in the accept/reject decision.
The inspector calculates the sampling interval by dividing lot size by required sample size, then uses a random start number to select every nth component. Components come from different cartons, pallets, or conveyor positions to cover the full production spread. The inspector immediately labels each sampled pair with a unique tag and moves them to the inspection table.
Key Control Points:
- Generate the random start number with an audited digital tool or sealed random-number sheet.
- Sample across all production shifts or machines that contributed to the lot.
- Never allow operators to hand-pick samples for the inspector.
- Photograph the selection process for the digital inspection record.
Pro Tip: Train inspectors to use the “3-second rule” – if a defect is visible within three seconds at normal viewing distance, classify it immediately.


Inspecting and Classifying Defects According to AQL Standards
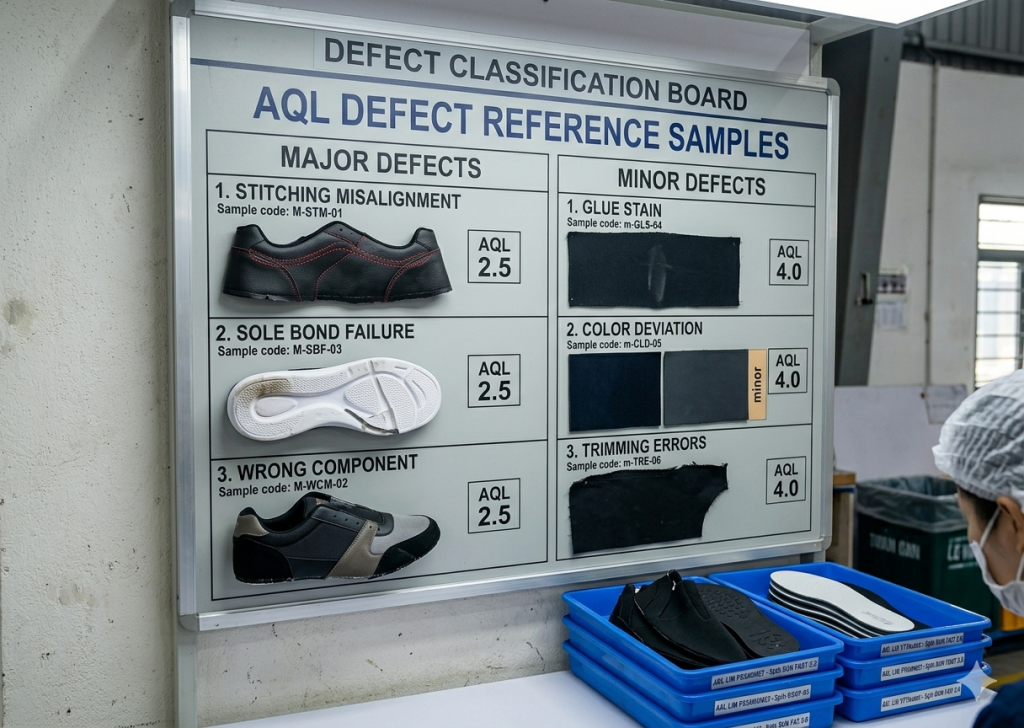
Defect classification groups issues into critical (safety or legal risk), major (functional or appearance failure that affects saleability), and minor (small cosmetic issues that do not affect use). Clear classification stops subjective judgments and ensures consistent decisions across shifts and inspectors.
The inspector examines each sampled component under correct lighting for visual, dimensional, and functional defects using a standardized checklist. Stitching misalignment, glue overflow, sole adhesion weakness, color deviation beyond Delta E 1.0, and size mismatch count as typical examples. Each defect receives a classification and count. Critical defects trigger immediate lot rejection regardless of quantity.
Key Control Points:
- Use buyer-approved defect reference samples and limit color deviation to Delta E ≤ 1.0.
- Measure critical dimensions with calibrated calipers and record actual values.
- Count each defect type separately and never combine categories.
- Stop inspection and quarantine the lot the moment a critical defect appears.
Expert Tip: Keep a live digital defect library on the tablet that includes photos and descriptions updated monthly from returned goods analysis.


Evaluating Results Against Acceptance Criteria and Deciding Lot Status
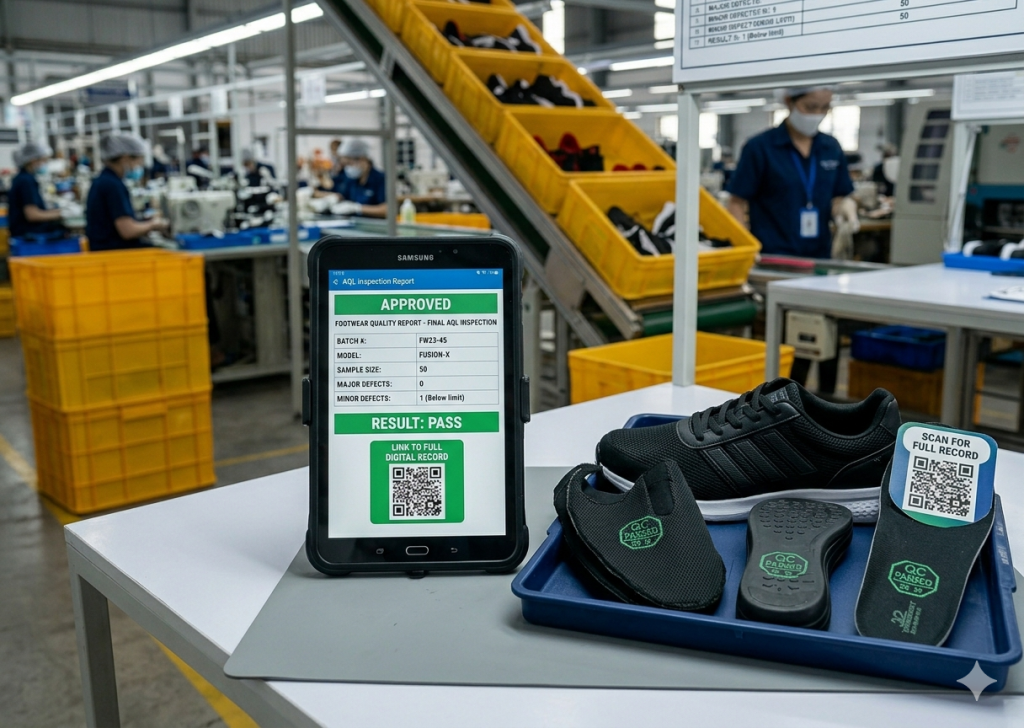
The inspector tallies defects per category and compares totals against the AQL acceptance (Ac) and rejection (Re) numbers from the sampling table. This evaluation step converts raw inspection data into a clear production decision and protects downstream processes from defective input.
If defect counts stay at or below the Ac number for every category, the lot passes and receives a green “AQL Pass” stamp. If any category exceeds the Re number, the lot fails. The inspector immediately segregates the failed lot and notifies the production supervisor within 15 minutes.
Key Control Points:
- Apply the double sampling plan only when the buyer contract explicitly allows it.
- Record exact defect counts, not just pass/fail, for every inspected unit.
- Issue a formal “Hold” tag with photos on every rejected lot.
- Notify quality manager within 30 minutes for any lot that fails on critical defects.
Expert Tip:
Integrate AQL results directly into your MES system so production supervisors receive real-time alerts on failing lots.
Integrate AQL pass rates into operator KPIs to drive ownership of quality.


Documenting Inspection Data and Driving Continuous Improvement
Documentation captures every inspection result in a digital or paper record that includes lot details, sample size, defect counts, inspector name, and decision. Complete records create traceability, support root-cause analysis, and demonstrate compliance during buyer audits.
The inspector uploads results to the factory ERP or quality dashboard within one hour of completion. The quality team reviews weekly trends, identifies recurring defects, and launches corrective actions such as operator retraining or machine adjustments. Data also feeds into the next blog topic on kitting.
Key Control Points:
- Use unique lot numbers and timestamps on every inspection record.
- Archive digital photos of defects with the inspection report.
- Review AQL data in weekly production meetings and update SOPs accordingly.
- Share pass-rate trends with the entire assembly team through visual management boards.
Expert Tip:
Calculate process capability (CpK) from AQL data every quarter to predict and prevent future defects before they reach the gate.
Conduct surprise cross-audits between shifts to maintain consistency.
Conclusion
The AQL-based random inspection QC gate transforms full shoe component quality from guesswork into data-driven control. When executed with precision, this gate protects the entire downstream assembly process and delivers consistent, high-quality footwear to your customers.
Next in the Full Shoe Assembly Series, explore Kitting (Component Bundling and Sequencing) in Full Shoe Manufacturing – Full Shoe Assembly Series, where approved components move into organized bundles ready for lasting and final assembly.
Expert Tip:
Always verify lot homogeneity before sampling – mixed styles or machines invalidate the entire plan.
Share monthly AQL summary reports with buyers to build trust and reduce third-party inspection frequency.


Frequently Asked Questions – FAQs
1. What is the most common AQL setting for full shoe components in footwear assembly? Most factories use 0 % critical, 2.5 % major, and 4.0 % minor under General Inspection Level II.
2. Can we use the same AQL gate for both uppers and soles? Yes – apply the same sampling plan but maintain separate defect checklists tailored to each component type.
3. How long should a typical AQL inspection take per lot? A 200-pair sample usually takes 25–40 minutes when the station is properly equipped and inspectors are trained.
4. What happens if a lot fails AQL on minor defects only? The lot is rejected for rework or 100 % sorting; minor defects still affect final customer perception.
5. Do we need third-party inspectors if we run a strong internal AQL gate? A robust internal gate significantly reduces the need for third-party inspections and builds buyer confidence.
6. How do we handle mixed-size lots in one production run? Treat each size as a separate lot or use stratified random sampling proportional to size quantity.
7. Is AQL applicable during peak season when production volume doubles? Yes – simply scale sample sizes according to the AQL table; the system remains valid regardless of volume.
Expert Tip:
Use red and green tags only – never rely on verbal communication for lot status.
Train new inspectors with 50 supervised inspections before independent duty.