Insole and Outsole Pattern Construction in Footwear Manufacturing
In footwear manufacturing, insole and outsole pattern construction forms the structural foundation of every shoe. While upper pattern making receives attention for aesthetics and fit shaping, bottom pattern accuracy directly determines heel alignment, waist balance, sole trimming precision, and long-term durability.
Even a deviation of 0.5 – 1.0 mm can affect the entire shoe structure. For example, small errors may cause heel seat misalignment, waist spring distortion, or excessive trimming during finishing. Consequently, footwear factories treat bottom pattern construction as a critical engineering activity rather than a simple drafting process.
In this article, we explain the complete professional process used in footwear factories to develop:
- Insole patterns
- Outsole patterns
- Full seat construction
- Louis heel construction
- Knock-on heel construction
- Eaton insole development
- Bottom allowance control
Therefore, this guide provides both technical explanations and practical factory tips to help pattern engineers achieve consistent bottom accuracy.

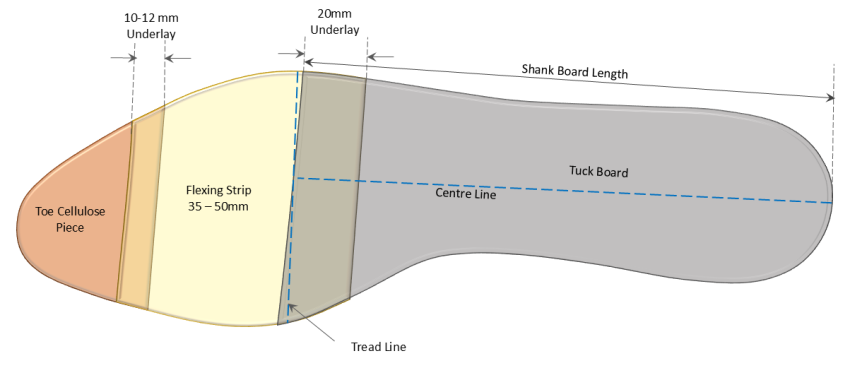
Insole Patterns – Precision Before Production
Footwear engineers cut insole patterns with extremely tight tolerances of approximately 0.5mm – 1mm. In addition, the outline must remain perfectly smooth without bumps, especially in the waist and heel seat area.
If engineers cut the insole slightly larger than required, the waist may spring to one side during lasting. On the other hand, if they cut the insole too small, the feather edge may become exposed and reduce the bonding area. Therefore, factories always verify insole accuracy before starting bulk cutting.
Manufacturing Risks of Incorrect Insole Size
If the insole is too large:
- The waist may spring to one side.
- Upper lasting becomes unstable.
- Heel seat alignment may shift.
If the insole is too small:
- Feather edge exposure may occur.
- Upper material experiences strain.
- Adhesion area reduces, affecting bonding strength.
Role of the Last Maker’s Bottom Pattern
The last maker’s full bottom pattern is generally supplied with new lasts. However, it is slightly oversized and should not be used directly as the final insole pattern.
Instead, it is useful for:
- Checking spring
- Verifying toe shape
- Assessing selected bottom contours
- Producing bottom plates
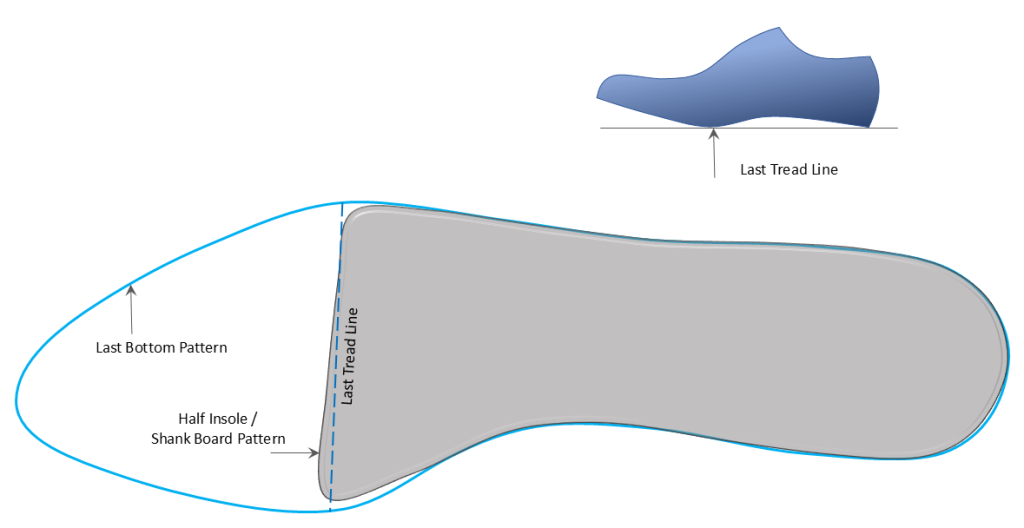
Fully Plated Lasts – Structured Development Method
When constructing an insole for fully plated lasts, the process must follow strict alignment rules.
The last bottom is first placed on paper and traced. An allowance of approximately ¼ inch (6.25 mm) is added around the perimeter before cutting out the temporary paper template. This template is tacked or secured with double-sided adhesive tape onto the bottom plate, ensuring that the waist and seat are not distorted.
The plate edge is then marked by pressing the paper down over the edge. A hard pencil may be used to define the crease clearly. For high heel lasts, one or two slots may be introduced in the waist area to help the paper settle properly — however, these slots must never extend beyond the plate edge.
After removal from the last, the pattern is cut accurately to the marked line.
The seat portion is then folded along the central line to check symmetry. Slight differences may be averaged out carefully. However, this correction must not be attempted if the last bottom seat area is intentionally asymmetrical.
The pattern is finally checked on the last and adjusted if necessary.
Pro Tip: Waist Bias Control
After cutting the insole:
- Place it firmly on the last.
- Press down in the waist region.
- Observe whether it shifts left or right.
If springing occurs, the pattern contains bias and must be corrected before bulk cutting.
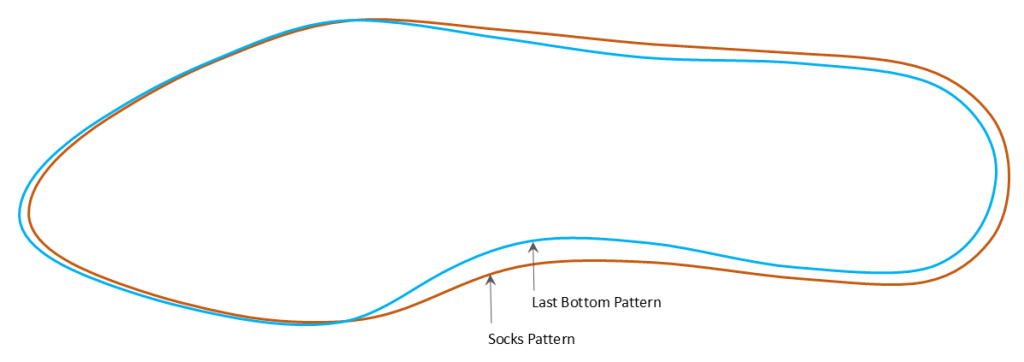
Outsole Patterns – Derived but Not Identical
Outsole patterns normally originate from the insole pattern. However, the outsole cannot simply duplicate the insole outline. Instead, engineers must add several allowances that compensate for upper material thickness, toe puff substance, stiffeners, and heel construction.
Additionally, the final outsole size also depends on the manufacturing process used in the factory.
For example, the following factors influence outsole measurements:
- Upper material thickness
- Backers and lining substance
- Toe puff and stiffener thickness
- Bottom stock preparation method
- Sole attachment method (stuck-on, veldtschoen, welted)
- Finishing method (prefinished or finished on last)
- Heel construction type
- Upper design style
Therefore, pattern engineers must evaluate these variables before calculating the final outsole allowances.
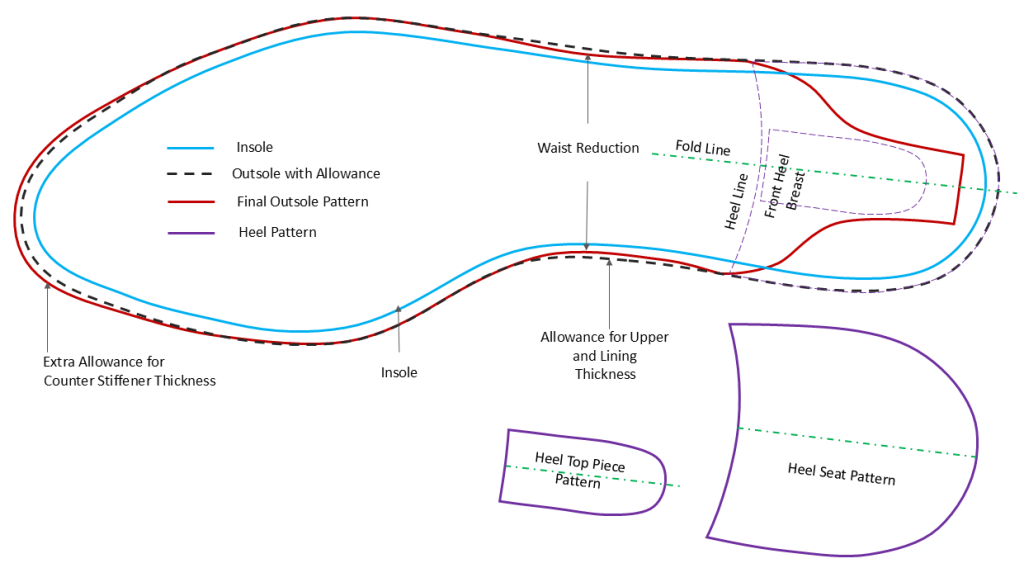
Method 1 – Full Seat Construction
First, the pattern engineer scribes the insole outline onto paper to create the base pattern. Next, using dividers, the engineer adds an allowance around the entire perimeter to accommodate upper material thickness.
After that, the engineer increases the allowance in the toe region where the toe puff extends over the feather. Similarly, additional allowance must be added in the seat area to compensate for stiffener thickness.
Meanwhile, the waist area usually requires reduction under the upper allowance. This reduction normally begins just behind the joint and continues toward the front of the heel.
Finally, the engineer blends all allowance transitions smoothly and cuts the outsole pattern carefully.

Factory Verification Rule
Pattern calculations must never be accepted without trial.
The outsole pattern must be checked using:
- A knife-cut insole (not hand-cut)
- A practical bottom assembly test
Adjustments are made based on real production conditions.
Pro Tip: Puff Coverage Discipline
Toe puff allowance should extend only where the puff overlaps the feather. Excess allowance leads to:
- Excess trimming
- Weak sole edges
- Finishing irregularities
Method 2 – Louis Heel Construction
Louis heel outsole development requires separate heel seat and heel breast templates.
The heel seat and front of seat shapes are first copied onto paper. These shapes are folded along the centre line and averaged if minor discrepancies exist.
The insole is then scribed, and the seat centre line is transferred.
Upper allowance is added using dividers, followed by additional toe puff allowance where required. Waist reduction is again applied beneath the upper allowance.
The heel seat template is positioned precisely 1⅞ inches (31.25 mm) forward from the back of the insole. Centre lines must coincide exactly.
The heel breast template is then aligned and traced. Waist lines are blended smoothly into the heel breast.
Allowance Adjustments for Louis Heels
For prefinished heels:
- Leave the heel flap net.
For covered heels:
- Add 1/64 inch (0.5 mm) for material thickness.
If trimming is required:
- Add 1/32 inch (2.5 mm) on sides.
- Reduce to 1/16 inch (1.5 mm) at sole junction.
- Add 1¼ inch (6.5 mm) at top-piece end and round generously.
Pro Tip: Heel Breast Blending
Sharp transitions between waist and heel breast create visible finishing defects. Always use large-radius blending curves.
Method 3 – Knock-On Heel Construction
Knock-on heel outsole construction follows a slightly different approach. First, the pattern engineer copies the heel seat shape onto paper. Next, the engineer folds the template along the centre line and averages the outline to ensure symmetry.
After that, the engineer scribes the insole outline and transfers the seat centre line. Then the engineer adds the required upper allowances and toe puff allowance using dividers.
However, heel placement differs from Louis heel construction. In knock-on heels, the heel seat pattern sits only 1/16 inch (1.5 mm) forward from the back of the insole.
Pro Tip: Flap Crack Prevention
Avoid tight internal angles in the flap region. Generous curve radii reduce stress during heel nailing.


Eaton Insole from Last Bottom Pattern
The Eaton method refines a last bottom pattern into a usable insole.
Adjustments include:
- Trimming both sides of forepart from toe to joint by 1/64 inch
- Setting in 3/8 inch and redrawing curve
- Reducing overall length by 1/16 inch
This technique compensates for bottom plate and lasting factors.


Allowance Guide – Imperial and Metric
Allowance values vary based on:
- Construction type
- Weight category
- Heel dependency
- Rand presence
- Stitching all-round or partial
The original measurement tables (Imperial and Metric) must be treated only as rough guides. Factory trials under actual production conditions remain mandatory.
IMPERIAL (Inches)
| Construction | Toe | Joint | Waist | Seat |
|---|---|---|---|---|
| Light ladies/childrens stuck on – prefinished | 7/64″ | 3/32″ | 1/16″ | 3/16″ ▲ |
| Light ladies/childrens stuck on – finished on last | 5/32″ | 1/8″ | 1/12″ | 7/32″ ▲ |
| Light ladies/childrens stuck on – finished on last | 5/32″ | 1/8″ | 3/32″ | 7/32″ ▲ |
| Medium weight ladies/childrens stuck on – prefinished | 5/16″ | 5/16″ | 5/16″ | 5/16″ |
| Veldtschoen – castor | 5/16″ | 5/16″ | 3/8″ | 7/32″ |
| Mens Welted – castor for n/c rough rounding | 1/4″ | 3/8″ | — | — |
METRIC (Millimetres)
| Construction | Toe | Joint | Waist | Seat |
|---|---|---|---|---|
| Light ladies/childrens stuck on – prefinished | 2.75 | 2.5 | 1.5 | 5.0 ▲ |
| Light ladies/childrens stuck on – finished on last | 4.0 | 3.25 | 2.25 | 5.5 ▲ |
| Medium weight ladies/childrens stuck on – prefinished | 4.0 | 3.25 | 2.5 | 5.5 |
| Veldtschoen – castor | 8.0 | 8.0 | 8.0 | 8.0 ▲ |
| Mens Welted – castor for n/c rough rounding | 6.25 | 9.5 | 9.5 | 5.5 |
▲ Dependant on heel. = Dependant on rand, and whether stitched all round.
■ Outside measurements – reduce joint by 1/16″ and waist by 1/8″ on the inside.
Conclusion
Insole and outsole pattern construction plays a critical role in footwear engineering. Accurate bottom patterns ensure proper heel positioning, balanced waist alignment, and consistent finishing quality.
Moreover, precise allowances help manufacturers reduce excessive trimming, prevent material wastage, and maintain product durability. Therefore, footwear factories treat bottom pattern development as a key technical discipline within pattern engineering.
Ultimately, engineers who master bottom pattern construction can significantly improve manufacturing efficiency and product quality.