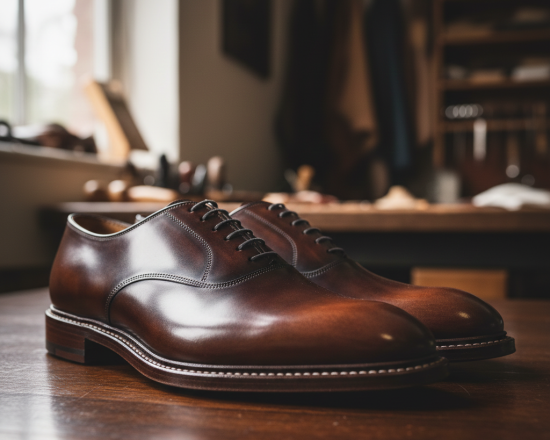
Goodyear Welted Construction – The Complete Step-by-Step Guide
Estimated Reading Time: ~ 15 minutes
If you’re just getting into quality footwear, start here → Types of Shoes and Shoe Construction – A Beginner’s Guide Then see the world’s most common method → Cemented Construction in Footwear Manufacturing Explained Now come with us to explore welted construction.
WELTED CONSTRUCTION
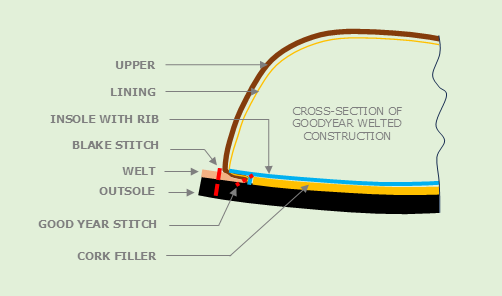
Goodyear welted construction uses an indirect attachment method. First, workers sew the welt, upper, and insole rib together with a chain stitch (horizontal seam). Then, they secure the sole to the welt with lock stitching (vertical seam). As a result, you enjoy a durable, fully resoleable shoe.
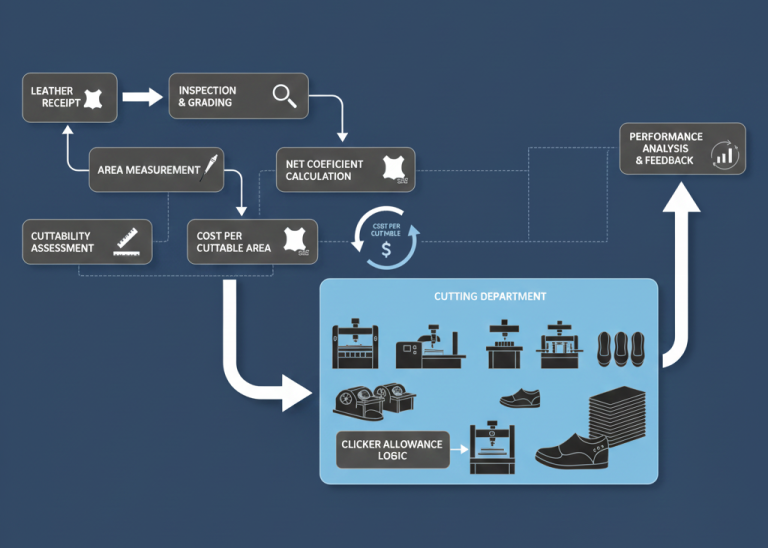
Full Goodyear Welted Process Flowchart
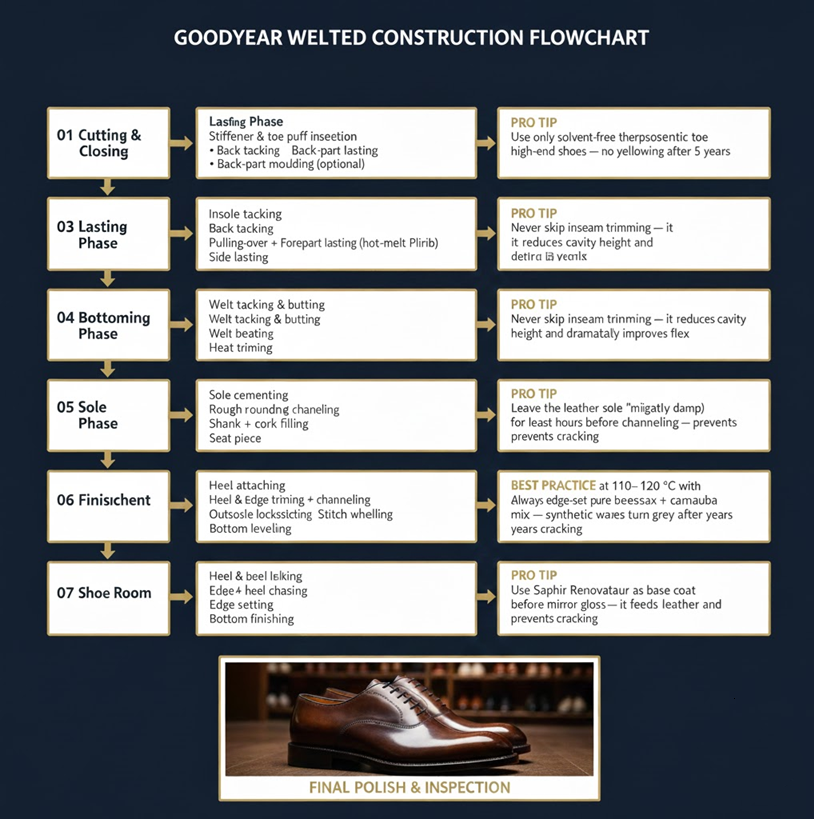
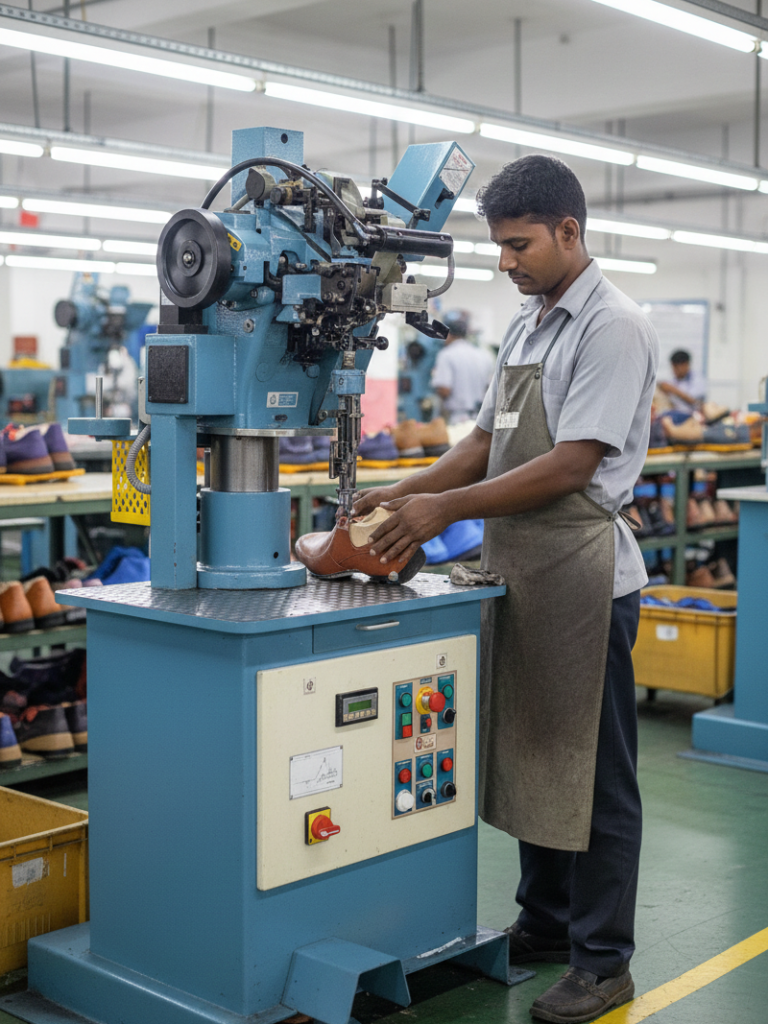
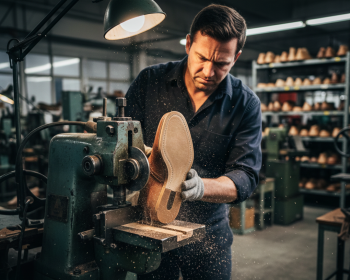
Making (Lasting and Bottoming)
Insole Attaching
Insole attaching usually starts the lasting process. Workers carefully position the insoles on the last. Then they secure them with 2-3 tacks in the forepart, one in the waist, and one in the heel seat. Ensure perfect alignment—no edges protrude beyond the feather line. Otherwise, you risk a lifted upper or visible welt seam. Moreover, side protrusions distort the feather line.
Stiffener and Toe Puff Insertion
Next, insert stiffeners (counters) between the lining and upper. Use pre-molded or sheet-style versions (thermoplastic or solvent-activated). Similarly, add toe puffs—typically solvent-activated or thermoplastic. Always skive them precisely. This prevents print-through and keeps wear comfortable.
Back Tacking
To center the back seam and set proper back height, tack the upper to the insole’s seat area. However, skip this if you use a back part moulding machine with a flanging device.
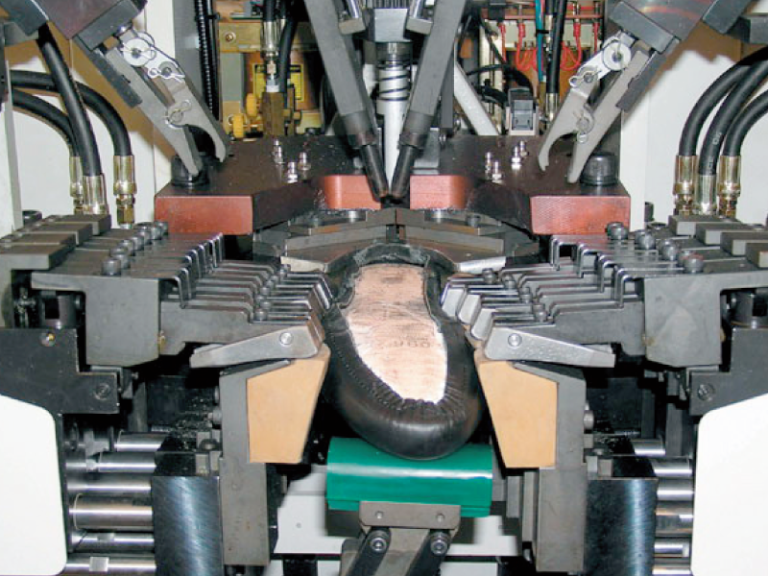
Pulling Over and Toe Lasting
Today, premium factories complete the entire toe area in one efficient operation using forepart lasting machines. They fasten everything with hot melt cement and a special ‘Plirib’ rib on the insole. For example, forepart lasting onto Plirib is now standard. Importantly, keep the rib flat so wipers glide smoothly. Even advanced 9-pincer forepart lasters work well for welted shoes.
Pro Tip: For high-end shoes, always choose solvent-free thermoplastic toe puffs—they stay soft and resist yellowing or cracking for 10–15 years or more.
Side Lasting
Similar to toe lasting, secure the waist area next. Workers apply a manual drafting pull to the upper. Then they fasten it firmly to the rib’s outer wall using horizontal wire staples on the side lasting machine. Nowadays, many factories use combined machines for forepart + side or seat + side lasting with Plirib. Still, high-end workshops prefer traditional staple side lasters for maximum precision.
Heel Seat Lasting
Usually, flat-last the seat with tacks—although cement lasting works too. This tightens the upper at the back for a snug fit. Critically, maintain exact back height. Also, drive seat corner tacks ¼ inch behind the rib’s end.
Heat Setting
Factories apply heat setting to lock in the upper’s shape quickly. They introduce moisture and high-velocity air to relax lasting strains. However, adjust parameters for each material. Always inspect thoroughly for defects like pleats before you proceed.
Upper Trimming
Prepare the lasted upper for welt sewing. Trim surplus lasting margin to 2–3 mm above the rib using an upper trimming machine. Remove insole tacks first. Trim extra far back at seat corners for clean results.
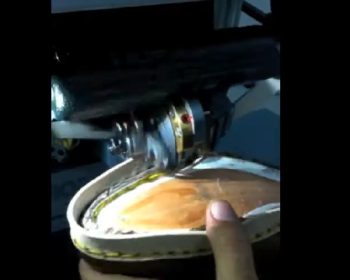
Welt Sewing
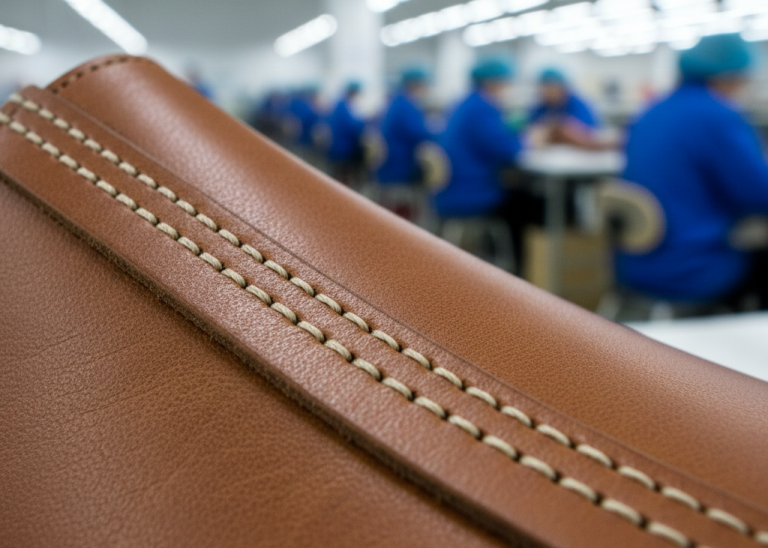
Welt sewing starts the bottoming phase. The welt is a narrow ¾″ wide, 2.5–3 mm thick strip of vegetable-tanned leather with a flesh-side groove for stitches. Bevel the grain side so it sits at right angles when beaten. Temper the leather in water beforehand. Then the machine forms a chain stitch with wax-lubricated nylon or linen thread (6–9 ply).
The wax coating prevents melting from friction and seals needle holes for better water resistance. Use a contoured guide matched to welt width. Adjust it carefully so the needle passes through the groove, upper, and insole rib. Finally, control thread tension tightly to hide stitches after beating.
Welt Tacking and Butting
In this skilled bench operation, beat welt ends back in line with the rib wall and tack them securely. Then skive the ends smoothly to blend into the seat piece. The operator’s expertise shapes the bottom line perfectly. Use insole score marks to guide your start and stop points.
Inseam Trimming
Use a cylindrical knife to trim the welt, upper, and insole rib flush to the seam. This reduces cavity height under the foot and boosts flexibility. Perform this carefully to protect the welt-sewing thread.
Best Practice: Never skip inseam trimming — it lowers the cavity height under the foot and dramatically improves flexibility and break-in comfort
Welt Beating
Beat the welt to a crisp 90-degree angle. Consolidate its fibers for a refined edge. Keep vegetable-tanned welts mellow during beating so they conform to the last shape. Afterward, let them dry fully before sole laying. Today, some work boots even use durable PVC welts.
Shank Attaching and Bottom Filling
The shank, steel or wooden is attached by adhesive. The shank can also be attached by eyelet type of rivets onto a seat board piece that fits into the cavity at the insole waist. This assembly is then cemented onto the insole. Since weight-bearing capacity of a footwear largely depends on this operation, shank also must follow the last contour at its waist area and be of required length and quality. Cork (traditionally), or felt filler etc. is usually used for bottom filling (forepart). Tar impregnated Cork filler, applied as hot, makes the shoe more water-tight and flexible. Cork may not any more be easily available.
Attach Seat Piece
A leather seat piece (the same substance as the welt) which is skived to match the welt skive is attached to the seat. The skived edge is cemented and the seat piece is tacked over the lasting allowance. Its job is to build up substance around the seat equal to that of the welt. The shoe is then passed through a drying cabinet at 25–30 °C to dry out filler and welt for sole attaching operation. This is to be noted that to obtain good finish at the seat area the seat piece must be cut from the prime part of the bend.
Sole and Shoe Bottom Cementing
The shoe and the mulled outsole (leather) are coated with latex adhesive and left for adhesive drying before sole attaching.
Sole Attaching
The prepared sole is attached using a sole laying press. It is necessary to design the sole to leave an allowance around the edge of the sole for rough rounding.
Rough Rounding and Channeling
This is one of the highly skilled operations in the attaching room. The function of this operation is to round the welt and the sole to a certain width all round the feather line and at the same time to cut the channel or groove in the sole for the purpose of lock stitching and protecting the stitches. Rough rounding machine must be set so that the distance of the sole edge from the center of the groove is about 1/8″.
The width of the groove varied by the type of knife and its depth should be such that the stitches are just buried. In case of channelling is done on the sole, it should be opened immediately after rough rounding operation as long as the sole is mellow. The machine opens and lays back the lip of the channel, so the channel is sufficiently open for stitching. This is done while the sole is still in mellow condition.
Pro Tip: Keep the leather sole “mellow” (slightly damp) for 4–6 hours after sole pressing — this prevents the channel lip from cracking when you open it for stitching..
Outsole Stitching
The outsole stitching, i.e. securing of soles to the welt is being done on sole stitching machine. The seam connecting the sole and welt is vertical and formed with two threads penetrating from each side and locking together (lock stitch). The machine is set for suitable stitch length for various welt and soling materials and the thread tension is adjusted so that the threads are locked about 1/3 of the substance. The length of the stitches depends on the substance being stitched; type of work and the size of awl, needle and thread used. It is usual to have an awl slightly bigger than the needle as it reduces friction from the hole.

Channel Closing
If the outsole stitching is not in a groove, but in an open channel, the open channel is cemented with latex and after drying the adhesive is then closed. The shoe bottom is pressed against a revolving brass wheel to lay the channel flat to the sole, covering the stitching.
Stitch Wheeling and Separating
It is a decorative operation. An indentation is made in the welt between each stitch to emphasize the stitching. This is done from the out heel breast position till inside joint. Number of indent teeth on the wheel must match the stitch length. Stitch separating brings each stitch out boldly, thus improving the appearance.
Bottom Leveling
This operation is performed on sole leveling machine. The machine is roller type or press type. The purpose of this operation is to make the sole conform to the bottom of the last, and set it permanently in such a position, remove all unevenness and to force the sole to the welt itself to the original position after welt beating.
Seat Nailing
The seat of the sole is permanently attached to the seat lift and insole with nails. The nail ends clench against the metal plate on the shoe last bottom.
Seat Paring (Seat Trimming)
The surplus heel and seat piece around the seat is trimmed to 1/8″ from the feather edge. This acts as a guide for heel attaching.
Finishing Section (Goodyear Welted)
Outside Heel Attaching
There are two methods of outside heel attaching used for welted footwear.
Method 1 – The shoe is placed in the machine with the heel in position but without top piece. Up to 14 tapered, square shanked, headless nails (“lightning heel pin”) are driven up through the heel into the insole leaving approximately 2 mm protruding through the heel base. The top piece is then pressed onto the protruding nails to be permanently attached at a later stage.
Method 2 – The shoe is placed in position in the machine, and bifurcated nails are driven into the seat of the sole in the required pattern. The identical pattern of holes are made in the heel, which is then transferred along a runway and accurately located onto the seat and placed over the nails. In this case, the top piece is already permanently fixed to the heel prior to its attachment.
Heel Trimming or Paring
The purpose of this operation is to determine the final heel shape, prior to scouring, by removing the surplus material with rotating cutters.
Heel Scouring
To remove any marks left by the heel trimming blades and make the heel edge smooth. The breast of the heel is also scoured smooth.
Correct result of heel scouring:
- Heel correct shape
- Scoured from corner to corner
- No scouring marks on the heel
- Smooth finish to heel
- No damage caused to the upper
- Fine scouring uses 180–220 grit paper.
Edge Trimming
This operation is to give final shape to the sole edge, and blending it to the heel, so that a smooth surface continues all round the edge of the sole. This operation requires most skill in the finishing room and sensitive handling.
Heel and Edge Coloring (Edge Inking)
This operation is done to color sole and heel edges. This is sometimes known as edge inking and generally a manual operation when finishing by traditional method. Tools required: narrow bristles tooth brush for the edges and a flat camel hairbrush for the heel. The finishes used is mostly water based, although spirit based stains are available. Special stains are available for the heel breasts, where treatments subsequently applied to the sole and heel edge cannot be undertaken (wax burnishing).
Heel Burnishing and Polishing
To force wax into the heel edge with waxing rolls. This machine is designed to give the heels increased resistance to water penetration and improve their shape retention during wear.
Seat Wheeling
Seat wheeling causes a narrow row of indentations to be applied around the top edge of the heel producing a decorative effect. Different wheels can be used to vary the number of impressions to the inch. For women’s work 24–60 is given and for men it is 16–26 indentations.
Edge Setting
The purpose is to force heated wax into the sole and welt edge in order to make it water resistant, retain its shape and improve its appearance. A heated iron is used which has a shape such that it marries up exactly to the sole edge shape. It is fitted on to an edge setting machine. Two basic types of machines available are oscillating type where the heated iron is oscillating and shoe bottom edge is pressed against, and rotary type where iron is setting the edge by rotary movement.
Correct result:
- Edges smooth and evenly covered in wax
- Sole edge shape well defined
- No wax smeared on the upper
Best Practice: Use only 50/50 natural beeswax + carnauba blend at 110–120 °C – synthetic hot waxes oxidise and turn grey within 18–24 months.
Bottom Scouring
To remove grain surface of leather soles and top pieces in preparation for the application of the bottom finish. Medium grade abrasive roller removes the hard grain, then finer grade (180 grit) produces a uniform smooth finish. Naumkeags are used at the waist. Correct result: fine nap finish, no scratches, edges remain square, no frayed stitching.
Bottom Making
The purpose of this operation is to color and polish the shoe bottom in order to enhance its appearance and improve the water resistance of the sole. This is to be applied in two coats in the form of base coat and a topcoat respectively.
Examples: clear wax + carnauba mop, colour spray + carnauba, or soft coloured wax + carnauba for high gloss. A decorative indentation may be given on the sole bottom edge.
Last Slipping (Delasting)
The last is removed and the shoe enters shoe rooming operation.
Shoe Rooming
Let us now understand the various processes involved in Shoe-rooming. The following are the main processes:
- Cleaning
- Repairing
- Wrinkle chasing
- Filling by base coat application
- Topcoat application
- Cutting and polishing
Cleaning
Before starting shoe-rooming operation, ensure that the surface to be finished has been cleaned. The purpose is to remove dirt, adhesives, other unwanted marks and contamination and prepare the surface to accept further finishing treatment.
Repairing
The purpose of repair is to bring the shoe to a good standard before continuing with the other operations in the shoe room. It can be done by using repair crayons, repair pastes, and spray paints for grain upper materials. The paste or spray can be either water or spirit based.
Wrinkle Chasing
Removing the wrinkles on the lasted upper by applying heat. This is done by ironing the wrinkled surface or by hot air blower. Application of heat contracts the material thus removing the wrinkles.
Filling / Base Coat
Filling or Base coat application is done to remove the ‘Open or Hungry’ look of leather after the Lasting process. Its purpose is to seal the surface for subsequent top dressing. It ensures that the top coat does not sink in and a minimum quantity of dressing material is used for the desired appearance and lustre.
Top Coat Application
This is the final treatment, which gives the shoe its lustre and finished appearance.
Cutting and Polishing
The process involves smoothing the grain on the upper material by cotton brush called Cutting or woollen brush application called Polishing.
Ancillary Operations
Apart from shoe dressing there are a number of ancillary operations, which ensure that footwear is dispatched in best possible condition. These are as mentioned below:
- Sole stamping
- Sock insertion
- Hot blasting, Ironing, Singeing : the purpose is to clear wrinkles on upper
- Ornament attaching : if required
- Inspection
Pro Tip: Apply Renovateur as the very first coat before any mirror gloss layers — it deeply nourishes the leather and prevents surface cracking for decades.
Conclusion
This detailed process shows exactly how the world’s top workshops still craft shoes today. Although heavier, slower, and far more expensive than cemented methods, Goodyear welted construction delivers true resoleability—often 8–12 full resoles—with proper care. Consequently, one quality pair outlasts ten glued ones and improves in character with age.
Invest once. Wear forever.