Complete Footwear Pattern Grading Guide: Co-ordination, Straight Grading, Hand Grading and Machine Grading Explained
Introduction — The Engineering Behind Footwear Size Development
Footwear grading is one of the most technically sensitive operations in shoe manufacturing. While grading is often described as enlarging patterns across sizes, in reality it represents a controlled engineering system linking last design, upper development, tooling investment, and production efficiency.
Every size must preserve the design intention of the model shoe while fitting its corresponding last accurately. If grading principles are misunderstood, factories experience problems such as distorted uppers, lasting difficulty, inconsistent heel proportions, or excessive tooling costs.
Historically, grading methods evolved to solve manufacturing challenges. Techniques such as co-ordination, straight grading, hand grading, pantograph machine grading, and group grading were introduced to balance fit accuracy with industrial productivity.
Co-ordination in Last Development
Co-ordination originated in the United States during the mid-1930s, most likely due to the wide range of fittings used at that time. The objective was to maintain identical heel heights across several sizes, thereby reducing the number of lasts required.
Instead of producing a fully proportional last for every size, sub-models are created from one basic model.
Example — Ladies Last Development
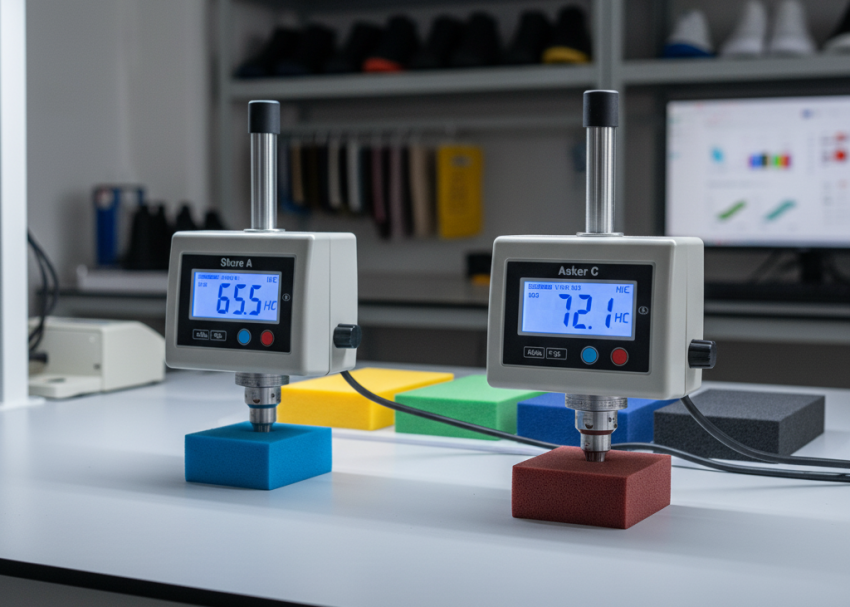
For a ladies’ last size 5 with heel height:
2½ inch ≈ 63.5 mm
Four sub-models may be required:
| Sub-Model Size | Size Range |
|---|---|
| 2½ | Size 2 – 3 |
| 4 | Size 3½ – 4½ |
| 5½ | Size 5 – 6 |
| 7 | Size 6½ – 7½ |
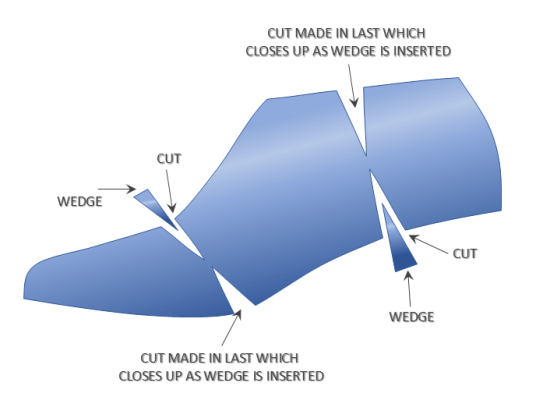
These sub-models are then cut and wedged.

Effect of Wedging
The wedge insertion adjusts:
- Toe spring alignment
- Heel height consistency
- Bottom profile relationship
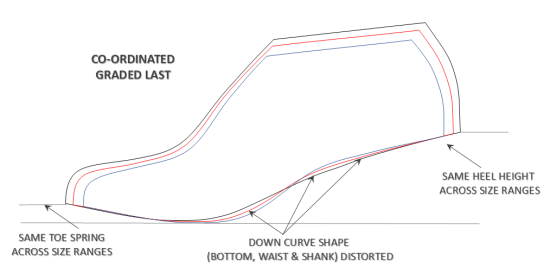
However, this produces noticeable geometric consequences. Because heel height remains constant:
- Smaller sizes appear proportionally high-heeled.
- Larger sizes appear flatter.
- Heel-waist shape changes significantly.
As a result, upper grading distortion may occur. Common factory issues include:
- Uppers too short in larger sizes.
- Excess length in smaller sizes.
- Shank curve mismatch.
- Insole moulding difficulties.
Co-ordination must not be confused with grouping.
Co-ordination modifies last geometry, whereas grouping standardises pattern usage.
Straight Grading of Lasts
Straight grading represents the most geometrically correct grading method. In this process, last height increases proportionally with length, ensuring natural shape progression across the size range.
Because every last has its own bottom contour:
- Toe distortion is avoided.
- Waist proportions remain stable.
- Assembly during closing becomes easier.
Key characteristics include:
- Identical shape relationship throughout sizes.
- No sub-models required.
- Consistent toe spring and back height progression.
Nevertheless, limited grouping may still be introduced to reduce component variation in production.
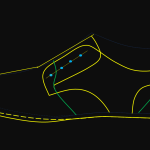
Hand Grading of Footwear Uppers
Hand grading remains essential during development and correction stages. It allows engineers to visually control grading behaviour before committing to tooling.
Main Procedure
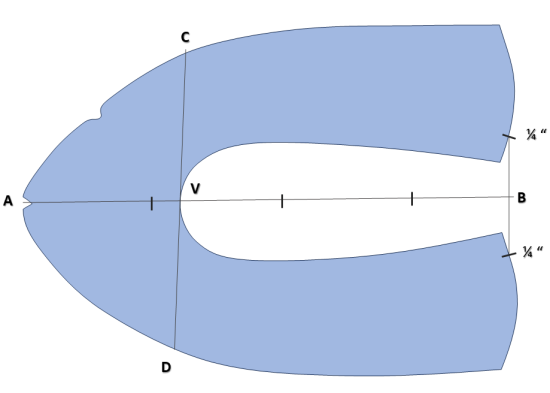
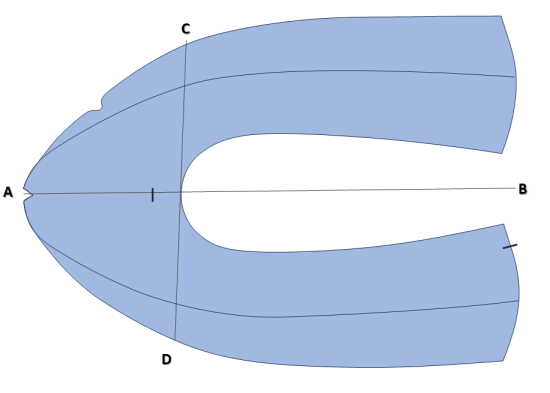
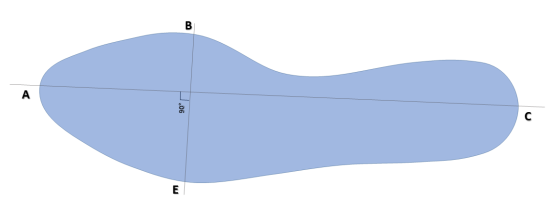
The process begins by measuring upper length from the counter point (approximately 12.7 mm below back height) to the toe point. A centre line is drawn through counter, vamp, and toe positions.
The grading framework is then developed as follows:
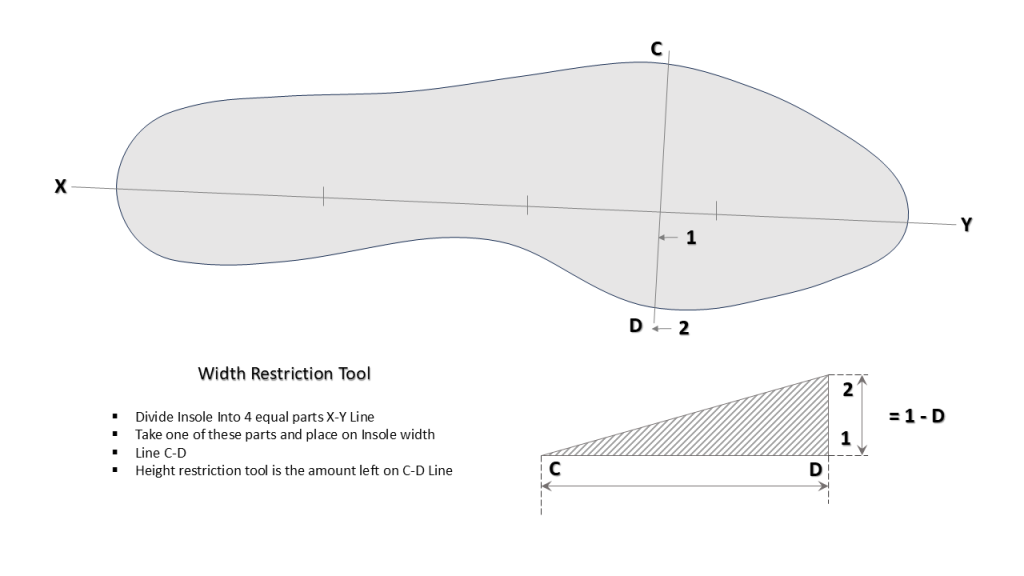
- Divide centre line into equal sections.
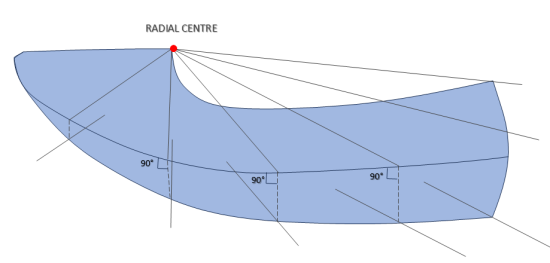
- Create perpendicular reference from vamp point.
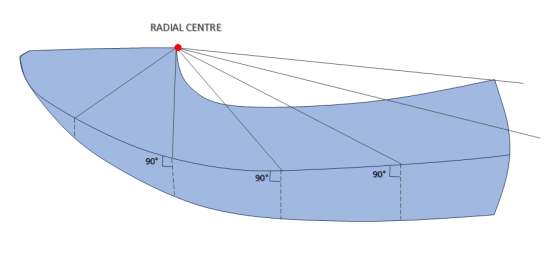
- Produce restriction line using radial grading tool.
- Draw radial grading lines toward width and length directions.
- Add perpendicular lines toward lasting allowance.
- Develop parallel grading outlines around the perimeter.
Finally:
- Measurements are transferred from radial tool.
- Sizes are pricked onto new pattern card.
- Each new size is created sequentially from the previous one.
This method ensures visual accuracy but requires skilled technicians.

Machine Grading — Pantograph System
To improve efficiency and repeatability, factories use pantograph grading machines.
Sequence of Operations
- Mount pattern sections onto steel carriers using spray adhesive.
- Cut and finish edges accurately.
- Mark carrier location slots.
- Punch fixing holes.
- Attach patterns securely using screws and studs.
Machine Settings
Measurements are entered using standard grading increments:
- Length grading: 1/3 inch ≈ 8.47 mm
- Width grading (uppers): ≈ 4.23 mm
- Width grading (insoles): ≈ 2.12 mm
Grading Order
- Select correct guide pin.
- Start machine.
- Grade main components first.
- Position markers.
- Grade underlays and folding allowances.
- Apply group grading where required.
Following this sequence prevents dimensional conflict between components.
Bottom Stock Pattern Accuracy
Bottom components require strict calibration before grading begins.
Verification procedure:
- Set length scale to three sizes increase.
- Indicator should show 25.4 mm movement.
- Set width scale similarly.
- Indicator should show 6.35 mm movement.
Pantograph indicator dials measure movement in increments of approximately 0.79 mm, allowing precise checking.
Resetting pointers to zero before measurement ensures reliable accuracy.
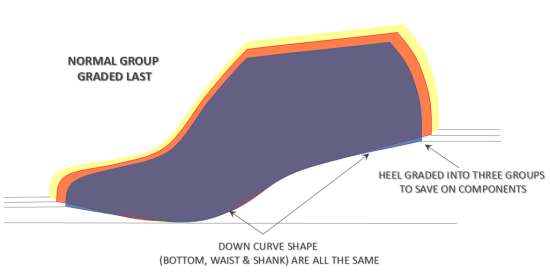
Centre Grading and Group Grading Principles
Normal grading produces unique patterns for every size. Although technically ideal, this approach increases tooling costs dramatically.
Group grading reduces this problem by holding internal pattern lines to a middle size across multiple sizes.
Industrial Advantages
- Fewer cutting knives required
- Reduced stitch-marking dies
- Faster production start
- Lower tooling investment
Important rule:
Outside lasting edges and back seam curves must always be graded normally.


Minimising Distortion — Two Key Methods
Standardisation inevitably introduces minor distortion. Two techniques minimise its impact:
Centre Grading
Careful placement of centre line ensures critical fitting areas remain correctly graded while deviations move to low-impact zones.
Group Grading
Size ranges are divided into controlled groups so extreme sizes remain close to model geometry.
Typical application areas include:
- Cutting knives
- Eyeletting machines
- Stitch marking dies
- Decorative punching
- Straps and accessories
Example of Size Grouping
Three-size grouping example:
| Size Range | Group Model Size |
|---|---|
| 5 – 7½ | 6 |
| 7½ – 9½ | 8½ |
| 10 – 12 | 11 |
Centre grading may also refer to grouping specific pattern areas to one controlling size.


Expert & Pro Tips
Experienced footwear pattern engineers recommend:
- Always validate grading on physical lasts.
- Check pantograph calibration daily.
- Never standardise lasting margins.
- Apply grouping only to internal fitting lines.
- Monitor upper balance after co-ordination grading.
- Maintain grading documentation for QMS traceability.
These practices reflect real production environments and reinforce technical reliability.


Conclusion
Footwear grading is a strategic engineering discipline rather than a simple scaling exercise. By understanding co-ordination, straight grading, hand grading, and machine grading together with centre and group grading principles, manufacturers achieve consistent fit while controlling tooling cost and production time.
A well-structured grading system therefore becomes a foundation for scalable, high-quality footwear manufacturing.